Random Creativity Crafts .com
July 17, 2023 at 7:38 am | Posted in crafts | Leave a commentI have been selling timeline stickers for Classical Conversations on Etsy for the past several years. If you were redirected from randomcreativitycrafts.com it is because I am still setting up my website, and the domain hasn’t finished updating quite yet.
You can find my products on Etsy at shopRandomCreativity

I decided to setup my own website so I can control to file size limits myself, allowing the entire sticker set to be downloaded at once instead of in several smaller parts. And I can list each level at one time instead of splitting them into semesters.
Baton Rouge Maker Faire 2019
October 18, 2019 at 10:06 am | Posted in crafts | Leave a commentI have a table at the Baton Rouge Mini Maker Faire this year. If you would like to buy anything from me, or have something custom embroidered, vinyled, screen printed, or sewn, send me a message through the “contact me” tab. I love the challenge of custom making orders 🙂


For my table at the Maker Faire, I made an x-y axis model, to demonstrate how many computer guided craft machines work. Printers, plotters (machines like Silhouette and Cricut,) 3D printers, CNC machines, laser and plasma cutters, and embroidery machines all use computer guided x-y axis systems. (3D printers also have another axis, called z, since they also go up and down, in addition to side to side.)
I made my XY axis from a 24″ piece of pressed board, spray painted white. I used bobbins as the rollers on the corners, and used some spare IKEA washers to raise one set up higher than the other set to prevent the strings from tangling. The center piece is a coke can, that I cut into a strip and then used foil tape to tape around a pen slightly larger than the dowels that I used. The twine is wrapped around one of the bobbins twice, in order for both sides of the dowels to travel in the same direction.
I have a silhouette cameo machine, which I brought to run during the faire. I use a Bernina 4430QE embroidery machine that I bought used from Facebook marketplace a a few years ago. We also have a 3D printer, which my husband bought from monoprice, and he has access to a plasma cutter at his work.
If you are interested in learning more about computer guided XY axis machines, here are some interesting links:
- This is an excellent article from Make magazine, that explains G Code, the coding language of 3D printers.
- This is another article about G Code from all3dp, that uses the images from Make but goes into much more detail about the code.
- This is an interesting short lesson about what information an embroidery file sends to an embroidery machine, from Janome. Embroidery machine manufacturers all use their own proprietary file types and code languages.
- This is a wiki article about the information included in the code for the DST file format, which is an older format that is almost universally useable by embroidery machines.
- This is the maze generator website I used to generate the maze I used on my silhouette plotter during the Maker Faire.
- Turtle Stitch is a free website using programming to create embroidery files – it has a lot of links to interesting and free resources for both programming and machine embroidery.
I also had my iPad with animated bezier curves on it to play with. Most computer programs use bezier curves for generating shapes during the design process for these types of projects. Bezier Curves (usually called paths or points in editing software) scale without rasterizing (loosing quality) since they are a mathematically generated shape path and not an image that will distort.
- This is the animated bezier curve website by Jason Davies.
- Here is a free detailed book on GitHub about Bezier curves.
- MIT explains bezier curves on a brief page
- And the wikipedia article about bezier curves
Lost Tools of Writing 4th Edition VS 5th Edition
September 23, 2019 at 9:05 am | Posted in crafts | Leave a commentI homeschool my son, and often buy used curriculum. I purchased a used copy of The Lost Tools of Writing, 4th edition, for my son without realizing that the co-op he is in is using the newer 5th edition. Someone had an extra 5th edition teacher’s guide, which they gave me, and also let me borrow their student workbook for an afternoon so I could compare the two and figure out which worksheet pages coincide with each other.
I made a chart, for my son to reference this year since he will be doing different page numbers than listed in his assigned work (essentially the same worksheets, just different places in the book.). A few of the worksheets are different, and I will be using the newer edition in the teacher’s guide where I can. There were really only 5 places where the worksheets differed enough to be noticeably different, so I listed those out on the last page. You can really use the old edition with minimal hassle, and since I saved $125 getting it used it is totally worth the hassle. In case anyone else is wanting to use the older 4th edition in a class using the newer 5th edition, I am uploading the page numbers chart that I made.
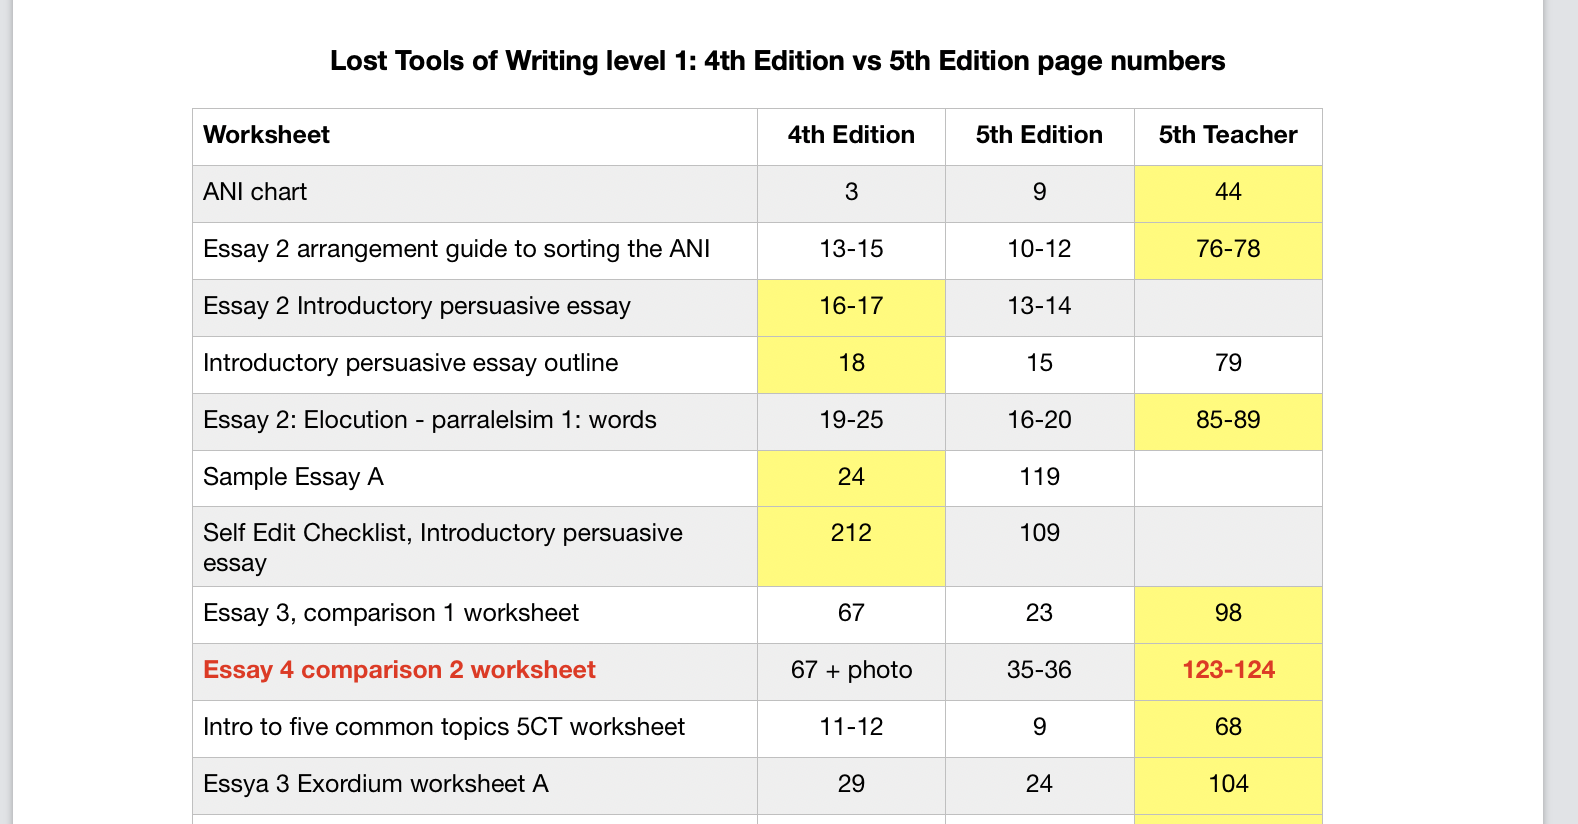
I highlighted the page numbers I plan to use with my son, since I have access to the 5th edition teacher’s workbook which includes many of the worksheets. The older edition worksheets are essentially the same, with the exception of a few which I have typed in red (like “Essay 4 comparison 2 worksheet” in the photo.) For those few worksheets, there is a page at the end with a description of how the pages are different in the new edition. In the example above, “Essay 4 comparison worksheet: 1st page (67) is the same, 2nd page in new edition includes: an example from Narnia, and a space to fill out with “While __ (term A) is __ (a group of thing), __ (term B) is __ (a different group or thing). ” Nothing too crazy, and it will be easy to adjust for your student to follow.
Here is a [link] to the chart I made, in case you missed it above.
Ham and Cheese Crispy Bread
December 8, 2017 at 9:27 am | Posted in crafts | Leave a commentSuper crisp crust topped with ham and a mustard spread… Makes a nice light lunch. One batch makes two 15″ squares, which will each serve 2-3 people as a meal, or each square can be cut into 30 appetizer servings
FOR THE CRUST
1⁄2 tablespoon yeast
2 teaspoons sugar
3⁄4 cup water
2 tablespoons oil
2 cups flour
FOR THE TOPPINGS
6 tablespoons butter (softened) or 6 tablespoons mayonnaise (softened)
6 tablespoons spicy brown mustard
8 ounces shaved ham
4 ounces shredded monterey jack and cheddar cheese blend
For the crust:
Place warm water in a bowl. Add yeast and sugar. Let it ‘proof’ for 5 minutes or so, until the yeast froths.
Stir in the oil, then work in the flour. Knead until smooth, and divide dough in half. Preheat the oven to 350* F.
Lightly oil a 16″ baking sheet. Roll half of the dough out into a 15″ square. The dough will be very thin, but the oil should prevent it from sticking to the baking sheet. (You may need to sprinkle a little flour on the dough to keep the rolling pin from sticking.).
Repeat with the remaining dough and another pan.
For the Crispy Bread:
Blend together the mayo and mustard, and spread in a thin layer over the crusts.
Chop the ham into small pieces and distribute evenly over the 2 crusts.
Shred the cheese, and divide evenly over the 2 crusts.
Bake for 15 – 20 minutes, until crust is golden and crispy. Enjoy.
Foam Mayflower craft
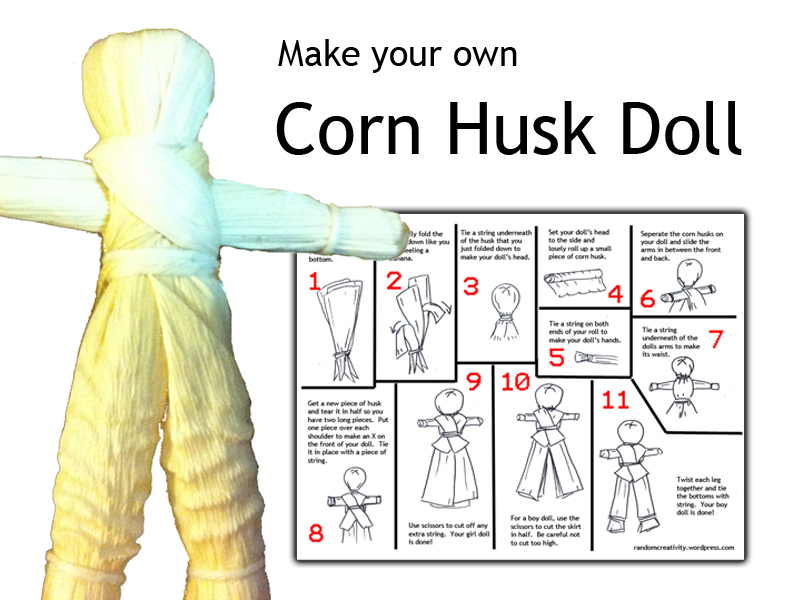
November 16, 2015 at 4:10 pm | Posted in crafts | 1 CommentTags: corn husk doll, inexpensive, mayflower, pilgrim hat, thanksgiving, thanksgiving craft

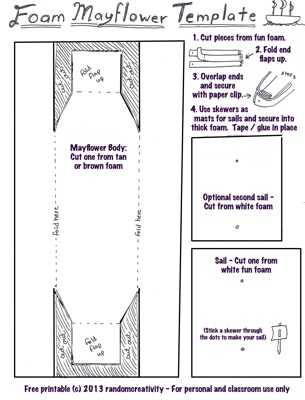
This is a craft I designed for the annual Thanksgiving celebration I participate in with our local homeschool group. 2 years ago our theme was explorers, and I thought the foam boats would be a fun craft and activity to float in gutters once they were made. I was searching for something really easy to put together, and inexpensive. Since I couldn’t find anything like that I designed my own, and was pleased with how well the boats floated due to the lightweight foam. For that activity I prepared kits in bags containing all the pieces each child would need since we had ~100 participants, but for an individual child or small group of kids you don’t really need to do that.
I used a cut up foam pool float for the inside thick foam to attach the sail to – a pool noodle from the dollar store would work equally well – you just need something to stab the mast (a bamboo skewer) into that is lightweight and can be taped into the bottom of the boat – any kind of styrofoam would work. The float I found was pink, so I spray painted it brown to match the foam I used, but you could cover it with matching foam if you would like to. Since I was making 100 kits I decided spray paint would be much easier, and faster.
You can download the free .pdf pattern to make your own here: mayflower craft
From previous years I also have a tutorial to make your own cornhusk doll:
And directions to make a paper pilgrim’s hat:

Enjoy!

Tardis T-shirt (bleach resist)
July 2, 2015 at 5:32 pm | Posted in crafts | Leave a commentTags: bleach resist, DIY clothes, doctor who, tardis shirt, tardis stencil

This is a repost from 2011, that I am revisiting to make myself a tardis shirt…
I am constantly amazed at how quickly my son goes through clothes, between growing and staining them. So when I saw Michael’s had plain t-shirts on sale for $2 each, I picked up a bunch, thinking he could just wear them as is. He would have been fine with that, but I, on the other hand, just couldn’t leave them alone. And since one of the shirts was black, I decided to try out bleach resist, with a tardis stencil of course. You could also do planets, a space ship, or the death star. Or really anything on any other color shirt. Continue Reading Tardis T-shirt (bleach resist)…
Egg Yolks and a Breakfast Casserole Recipe
June 4, 2015 at 5:40 pm | Posted in crafts | Leave a commentRecently I found myself with 36 egg yolks. My husband has been following a low calorie diet, and has been eating a lot of egg whites. Since the equivalent of 7 egg whites is the same price as 18 whole eggs, I figured I would just separate the yolks out myself, and use them for “something” else.
The most yolk-heavy recipe I found used a measly 6 yolks, and yielded 50-60 cookies. I wouldn’t want 20 cookies in my house, let alone the 350+ I would make to use up all my yolks.
So, this is my new yolk-heavy recipe. In case anyone else has three dozen egg yolks hanging out in their fridge, just waiting to be cooked. 36 egg yolks is right around 2 cups. If you only have a dozen or two egg yolks you can easily add whole eggs to make up the difference, a large egg is around 1/4 cup.
- 2 cups egg yolks
- 4 eggs
- 1/2 lb cheese, shredded (I used a white Monterey Jack, a mozzarella would make it less fattening)
- 1 lb ground pork, or breakfast sausage
- 1 large onion
- 1 bell pepper (or several of the smaller multicolored peppers)
- (garlic, salt, pepper, parsley, caraway, and charnushka to taste, if using pork)
- Cook the sausage or ground pork. I can’t eat MSG so I make my own sausage scramble by cooking 1 lb of ground pork and adding in sausage spices to taste – super easy. I use around 1 tbsp garlic powder, 2 tbsp parsley, and 1 tsp each caraway seeds and charnushka.
- While the pork is cooking, slice the onion and peppers. Grease a 13″x9″ baking pan.
- Spread the cooked sausage in the bottom of the pan.
- Cook the onion and pepper until just done (the onion will be slightly translucent.)
- Sprinkle veggies over the meat, followed by the cheese. Pour the egg yolks (only) evenly over the mixture.
- Lightly beat the 4 eggs, and pour them over the top of the mixture. I put the eggs separately on top so it will look more normal, with the white and yellow mixed. (That is also why I chose a white cheese.)
- Bake at 350* F for 20-30 minutes, until lightly golden and bubbly.
Not the healthiest dish, but a quick way to use up 3 dozen egg yolks 🙂
Luckett Farms CSA in Baton Rouge, LA
May 6, 2015 at 5:09 am | Posted in Food, garden, totally random | Leave a commentTags: CSA, Farm to Table, Luckett Farms
This is a bit random, but I wanted to post a review of Luckett Farms, the local CSA (Community Supported Agriculture) that we joined this summer. Several of my friends participate, and had posted on Facebook how much they enjoy the produce so I decided to give it a try. I was a bit disappointed that I couldn’t find any reviews or photos before I bought a share though, so took some photos and weighed the produce to satisfy my curiosity, and am posting it because I can’t be the only person who wants to know this information. 🙂 The photos aren’t the greatest, since I snapped them with my cell phone as I was processing the veggies, but bad photos are better than no photos 🙂 I have the first three boxes photographed, weighed, and price compared below, and will update it to add the remaining 5 boxes as the summer progresses. Week 1:  My first box contained: Continue Reading Luckett Farms CSA in Baton Rouge, LA…
Ancient Grain Pilaf
August 19, 2014 at 9:04 pm | Posted in crafts | 1 Comment
I love to try new things, which sometimes leads to random ingredient purchases that I am not quite sure what to do with. Last year I bought 1/2 cup of amaranth from the bulk bins at the grocery store, and I loved it. So I ordered the five pound bag online, and now find myself with a surplus of amaranth sitting in the pantry. Continue Reading Ancient Grain Pilaf…
Lemon or Lime Shaved Ice
August 1, 2014 at 12:04 pm | Posted in crafts | Leave a comment
Refreshing treat during the 10 hot summer months we experience each year here in the south 🙂 Its quick and easy to toss together. You will need an ice shaver. I like it really tart, you can make it milder by adjusting the amounts of sugar and lime juice.
- 6 -8 ice cubes
- 3 teaspoons sugar (or splenda)
- 3 teaspoons lemon juice or 3 teaspoons lime juice
- Shave the ice in an ice shaver, into a cup.
- Sprinkle the sugar on top of the ice.
- Pour the lime juice on top of the sugar.
- Using a spoon, incorporate the gooey lime-sugar mixture into the ice. Enjoy!
Cooking Games
For cooking games my yuku and food username is Random Rachel. Please leave a comment as a review for recipes you have tried. Even if you aren't playing cooking games, comments are a great way to review a recipe or project you have tried :)
Thanks for visiting!
Follow on Facebook

Popular Tutorials:


Blog at WordPress.com.
Entries and comments feeds.
