Handmade Christmas: Matryoshka, baboushka, or kokeshi ornaments or necklace
December 7, 2010 at 6:00 am | Posted in crafts, Handmade Christmas | 6 CommentsTags: baboushka, christmas ornament, handmade Christmas, kokeshi, matryoshka
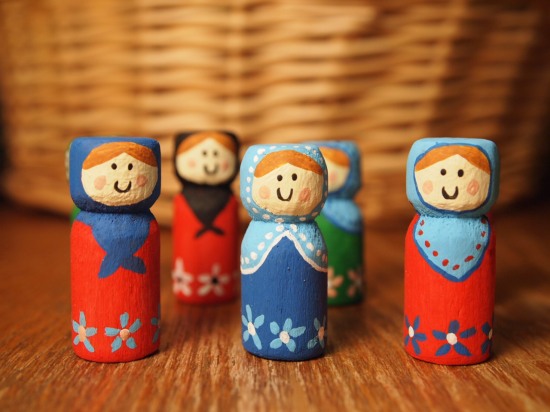
I love these little ladies- they are fairly simple to make, and look so cute! Russian nesting dolls are called matryoshka, or baboushka. Japanese round or tall dolls are called kokeshi. Whatever you decide to call them, they are characterized by their distinct body shape and lack of appendages. I love how they look, and thought they would make cute ornaments or jewelry. I also found some really cute free printables, (and linked to them in the bottom of this post) so you can have a matching card and tag too.
You will need: old style wooden clothespins (available at the dollar tree,) acrylic paint in a few colors, a paintbrush or two, and some way to cut your clothes pins (I used a dremel tool)
First, trim the bottoms off of your clothespins. I tried a hack saw at first, but I am not too adept at using one on something so small. I used the cutter blade of my dremel with great results – if I had a band saw I would have used it.
The bottoms of the dolls were pretty rough when I got done with them, so I used a sander bit to level them out, and slightly rounded the edges for a more finished look.
Here are the wooden blanks, all lined up and waiting to come to life.
Acrylic paint dries quickly, so by the time I finished one base coat on all seven dolls, the first one was completely dry and ready for the next color. Lighter colors may require two coats to hide the wood grain – I let it show through a few because I liked how it looked.
Add a hood, and then a face. There are several styles that you can do, do a google image search if you need more inspiration.
Paint on a swatch of hair, eyes and a mouth, and some rosy cheeks. The faces really make a huge difference, and the hoods suddenly look so much better.
Have fun adding details. You could also draw on the dolls with a sharpie marker, or make dot flowers using the handle of your paint brush.
They look pretty nice already, but a coat of varnish really makes them appear more finished. I used a brush on polyurethane, and the eyes bled a tiny bit. A clear coat spray paint would be much easier to apply, and less likely to affect the paint.
Now the dolls really look finished. To turn your dolls into ornaments or necklace charms, screw a small eyelet into the top. (I still haven’t made it into the hardware store to purchase my eyelets.)
Zakka Life has an adorable template that you can print onto the back of some pretty paper to make your own adorable matryoshkas card. I made this one for my sisters birthday a few weeks ago – I love how the little dolls fold out! You could make one to match your little ornaments.

Sew to Speak has a free pattern to make felt ornaments, if you’d rather sew than paint. (That’s her image above)
A Print a Day has several really cute free printables: a matryoshka calendar, kokeshi notepaper and gift tags, and matryoshka notepaper and labels. – no sewing or painting involved there.
And, totally unrelated to handmade Christmas, these measuring cups are impractical but really, really cute:
I sort of want them, but not really, because how are you going to scoop stuff without a handle? But they are so cute.
6 Comments »
RSS feed for comments on this post. TrackBack URI
Leave a comment
Blog at WordPress.com.
Entries and comments feeds.


Beautiful & oh so classic!
Comment by Young Wifey— December 7, 2010 #
These are so cute!!!! Are we going to see any of your craftiness tonight at the tea? These would make a great gift for the ornament exchange tonight. Love them. BTW, I love those measuring cups. Where did you find them?
Comment by mommashelby— December 7, 2010 #
Thanks – I will be bringing a handmade ornament 🙂
I fixed the link on the measuring cups, if you click on the picture it should take you to the website. They are only $12, which I didn’t think was bad for something like that. I am too practical to get them – but they are so cute!
Comment by Random Creativity— December 7, 2010 #
[…] Make matryoshka dolls […]
Pingback by Incoming: Moscow, Russia | Thanksgiving Roadtrip— March 7, 2011 #
[…] Matryoshka Ornaments / Charms – 45 minutes […]
Pingback by Handmade Christmas Gifts « Random Creativity— December 6, 2011 #
[…] Peters, author of Random Creativity, has shared a colourful tutorial with the Handmade Christmas Campaign. Thank […]
Pingback by Russian doll ornaments. From America with love. | handmadechristmascampaign— November 22, 2012 #