Tamales
June 8, 2012 at 12:48 pm | Posted in Food | 3 CommentsTags: step by step photo directions, tamale recipe, tamales, tutorial

My husband’s grandmother taught me how to make tamales a few years ago. It is a little time consuming, but they are delicious and the recipe makes a huge batch of tamales so its well worth the extra time and effort required. My sister was visiting this week, so I decided to make a batch of tamales since they go much quicker with two people rolling them out. Continue Reading Tamales…
Adding Sleeves to a strapless dress part 2: cap sleeves
July 26, 2011 at 5:45 am | Posted in crafts, handmade wedding | 1 CommentTags: add cap sleeve to sleeveless dress, diy cap sleeves, make your own sleeve pattern, tutorial

A lot of people have been looking at my post on how I added ruffle straps to my sleeveless dress, so I thought that I would share the cap sleeve that I made, but didn’t use. I decided that it was a little too much sleeve next to the sleeveless dresses the other girls were wearing so I didn’t finish it, but I saved the pattern in case I ever have an occasion to wear a formal gown. My plan was to stitch the sleeve to the inside lining of the gown; or to attach it with buttons, just like the ruffle straps. Continue Reading Adding Sleeves to a strapless dress part 2: cap sleeves…
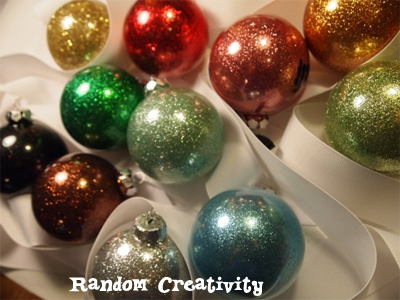
Handmade Christmas: Glittered Christmas Bauble Ornament Tutorial
November 29, 2010 at 10:11 am | Posted in crafts, Handmade Christmas | 10 CommentsTags: christmas ornament, glitter inside ornament, glitter ornaments, handmade Christmas, personalized glass baubles, tutorial

This year, I have been making the cutest little ornaments, if I do say so myself. I love the look of glitter, but absolutely hate having it all over my house. And with a 5 year old, the glitter WILL end up all over the house. My Mom showed me how to make these ornaments last year, and the glitter is all inside. That means that it won’t fall off, can’t be rubbed off, and that you can apply vinyl or other decorative accents to the outside of the ornament. Continue Reading Handmade Christmas: Glittered Christmas Bauble Ornament Tutorial…
50 cent clock make over
June 3, 2010 at 9:34 am | Posted in crafts | 1 CommentTags: clock, DIY, free printable, redo clock, step by step photos, tutorial, upcylced

My sister from Florida came to spend a week with me – yay! Of course, we had to visit the second hand stores while she was here, and I found four of these Ambien clocks, new in the package with batteries, for 0.50 each. Cheap clocks are incredibly easy to redo, so I thought I’d share :0)
First, turn over the clock and look for a tab slot – most clock faces are held on by three little tabs. One tab may be longer than the others, so leave that tab for last. Flip the clock back over, and slide a flat head screwdriver or knife down between the face and the slot, gently popping the tab out. After you do two of the three tabs, the clear shell should just lift off.

The hands should just be pressed onto a movement, carefully pull them straight up. You may need to use a knife or screwdriver to help loosen them – be very careful not to bend the hands. Set them aside.

Remove the paper clock face, and set it aside. Now, you have several options. You can design your own clock face, use a photo, scrapbook paper, old magazine, etc, or paint over the existing clock face. I found several scrapbook papers that I liked, and printed a clock face onto them. I cut them out, used my crop-a-dile to punch out the middle hole, and stuck them on the clocks. Quick, and really cute.
Here is the blank clock face that I designed to fit my clocks (9″ across, I printed on a 12″x12″ paper since it wouldn’t fit on a standard 8.5″x11″ sheet.) You could open this file in a photo – editing software and insert a photo as the background. OR, you could design something, or use free clip art, etc as the background. You could also use plain white paper, like my husband suggested – blah, too plain for my tastes ;0)
Once you have the paper attached, slip the hands back onto the movement, and snap the cover back in place. You are done! Here is the finished clock – how cute would that be in a girl’s room?

You can also paint the clock if you don’t like the color – neon pink won’t really do for what I needed these clocks for, so I pulled out a few cans of spray paint. You could use a brush on paint for plastic as well.

After two coats, my clocks and hands looked good, so I left it at that. Here are the four clocks that I redid:

So, for $2.00 and some stuff I already had, I have four decent looking clocks. The green and white is my favorite. And, as easy as this is to do, you could really change out the paper seasonally if you really wanted to.
Upcycled sundress for my adorable niece and iron on tag tutorial
March 31, 2010 at 2:48 pm | Posted in crafts | 3 CommentsTags: DIY, free pattern, handmade tags, iron on tags, step by step photos, sundress, tutorial, upcraft, upcycle
 My mother in law gave me the bedspread that she had as a young girl (with permission to chop it up for crafty cuteness.) It was adorable! And it had the cutest little ruffled bottom. I don’t have any little girls but I am seeing my niece in a few weeks so I decided to make her a sundress with the ruffles at the bottom. I used the pattern at SnazzleCraft (it required a bit of playing with to get it to print right.) As I don’t have a little girl (and my favorite color is blue,) I don’t have any pink ribbon or thread, but the green matched all of the flower stems so it worked out. I used snaps instead of buttons, and placed them in the back, so that my niece won’t be able to undress herself.
I love making cute things, and I like to put tags in them. Why? I don’t know. But I do. :0) So here’s how I did it, just in case you want to make some too.

You will need the following supplies:
- small amount of screen printing ink/paint or soft fabric paint (not the tulip puffy kind)
- alphabet stamps (I got these out of the dollar bin at Michael’s last year) or custom stamp
- freezer paper
- scrap of paper to use as spread
- ribbon or fabric scraps
- iron and cloth
- heat n bond scraps
 Squirt a small amount of ink onto your freezer paper.
- Spread the ink out into a thin layer using your scrap paper (I doubled my scrap for a sturdier spreader.)
- Use the ink like an ink pad, working quickly since the screen printing ink dries quickly. Respread the ink as needed.
- Let the ink dry and set as per package directions. I let it dry overnight and ironed the next morning to set the ink.

 Cut a small strip of heat n bond and iron onto the back of your ribbon. I like to trim the stragglers off after applying the heat and bond, so that it seals the ends.
- Peel off the paper backing and iron onto your items.

You could also sew the tags in, or have them stick out the sides like a flag. You can use acrylic paint to make tags that won’t be laundered often, I prefer to use a fabric paint myself. This is a good use for scraps of ribbon, and small bits of heat and bond. (It is also why I never throw anything away and have piles of junk filling up my bedroom…maybe you shouldn’t save those little scraps after all.)
Pearl ring tutorial
January 14, 2010 at 3:49 pm | Posted in crafts | 3 CommentsTags: DIY, jewelry, pearl beads, ring, step by step photos, tutorial, wire wrapped ring

I finally got around to making another wire wrapped ring, and took pictures this time for a tutorial. I used a cheap faux pearl, but you can get real pearl beads, and nice faux crystals at most craft stores.

The supplies that you will need are:
scrap paper
single bead
20 gauge wire
26 gauge wire
large pliers
small pliers
pen / pencil
 First you will need to use a mandrel, or find something the same size as your finger. I walked around the house trying my wedding band on different things until I found a marker the exact right size. Next, I cut a strip of paper and wrapped it around my marker [hereafter known as the “mandrel”.] I slid the edges of the paper so that you would be able to clearly see how it was wrapped, but you really want it to be tighter.
Wrap the paper around the mandrel two times, drawing a line each time the paper overlaps. Remove the paper, and cut it off at the second line. You should have a strip of paper that is twice the length of your finger, with a line in the middle.
 Fold the ends of the paper into the middle, then flatten it back out. Draw lines on the two creases that you just made. These will be the marks that you need, you can erase the middle line or just ignore it. (I used some junk mail, hence the strange numbers.)
Use the paper as your ruler to cut the 20 gauge wire. You will need two pieces of wire. Use a permanent marker and mark the two outer lines on the wire.

Use your pliers and bend the wires at a 90* angle on both lines.
 Flatten the folds with your pliers so that the two ends meet in the middle (like your paper did.) At this point I lightly hammered the wires to strengthen them, (totally optional.)
 Lay the two wires side by side on your mandrel, and smooth into a ring. Make sure that the cut wires are on the inside.
 Use your pliers to bend the ends up at an angle, to form the faux prongs of your ring.
 Cut off a four inch or so piece of 20 gauge wire. Bend it with your pliers, and then wrap it around the top of the ring three times. It took me a few tries to grip the wire and wrap it around.

 After the top is wrapped three times, add the pearl and repeat on the other side.

 Use the 26 gauge wire and wrap the bottom of the band were the wires cross. Make sure that all of the ends are cut flush and filed smooth. Enjoy!
Simple Gift Tag
January 4, 2010 at 12:19 pm | Posted in crafts | Leave a commentTags: cheap and easy, Christmas, gift, gift tags, tutorial
I can’t bring myself to buy decent looking gift tags, since they are so simple to make. This is the type that I made this year, if you change up the paper and stamp you could use it for any gift giving occasion. I am thinking that a bell would be nice for weddings, and a heart for Valentines.


Supplies I used:
colored card stock (red)
red and black ink
tree and star rubber stamps
black marker
red curling ribbon
rivet setter and rivets
circle paper punch
I used a circle paper punch since I had it, but you could also trace a circle onto your paper and cut it out with scissors, or use a die cutter or plotter (like the Cricut or Slice.) I used my Crop-a-dile to set the grommets, and I think that they add to the tag, but it would still be nice without them. The tag is really self explanatory. All you need to do is punch the paper out, offset an appropriate stamp, add the rivet, and address it. Simple, nice looking, and cheap cost effective. You can also add a circle of patterned paper behind the solid circle, or some curling ribbon. Happy crafting!
Simple yet stunning silhouette painting
December 19, 2009 at 9:05 pm | Posted in crafts, Handmade Christmas | 1 CommentTags: Christmas gift, DIY, painting, silhouette, simple, tutorial, valentines gift, wedding gift
 I love silhouettes! This painting, which I gave my husband for Christmas, made a simple, yet stunning gift. If you can cut and trace, you can easily make a similar painting yourself. You will need:
A blank canvas (mine was 10×13 and cost $1.28)
2-3 contrasting colors of acrylic paint ($0.58 each)
Pencil, scissors, and paintbrushes
A silhouette photograph
I love how blue and white swirl together to make a sky like background, so I squirted the two colors onto a yogurt lid and blended them on the canvas until I liked it. You can blend whatever colors you like, or just paint the canvas a solid color. Let the paint dry thoroughly before tracing onto it. (I found my canvas was dry enough in about an hour.)
I looked through our wedding photos to find an appropriate image. Morguefile.com has some great free images if you can’t find one of your own.
You will want to print out the picture and then cut out the silhouette to trace. You can re-size the image before printing if needed – I like to use Word since it is so quick, but there are many programs that will work. Cut out the image with sharp scissors or a craft knife, paying careful attention to the details. Position and trace your image onto the canvas.
 I used a fine paintbrush to outline the image in my contrasting color – be careful to cover all of the pencil lead with paint. Use a larger brush and fill in the image with an nice even layer of paint. You may need to let it dry and go over it again with a second coat of paint depending on how much the colors contrast.

After I made a few of these, I played around with adding a few simple details, like another color or two, such as the light inside of the lighthouse painting below.
Let your painting dry, and enjoy! The variations on this simple project are endless, and this is an amazing gift for about $3 and only a few hours of effort. And it makes an even nicer gift if you frame it – I find high quality frames for $3-5 at Big Lots all the time.

Cooking Games
For cooking games my yuku and food username is Random Rachel. Please leave a comment as a review for recipes you have tried. Even if you aren't playing cooking games, comments are a great way to review a recipe or project you have tried :)
Thanks for visiting!

Follow on Facebook

Popular Tutorials:


Create a free website or blog at WordPress.com.
Entries and comments feeds.
