Handmade Christmas: Glittered Christmas Bauble Ornament Tutorial
November 29, 2010 at 10:11 am | Posted in crafts, Handmade Christmas | 10 CommentsTags: christmas ornament, glitter inside ornament, glitter ornaments, handmade Christmas, personalized glass baubles, tutorial

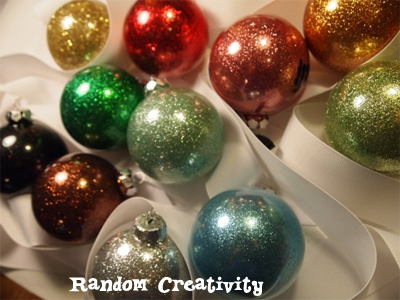
This year, I have been making the cutest little ornaments, if I do say so myself. I love the look of glitter, but absolutely hate having it all over my house. And with a 5 year old, the glitter WILL end up all over the house. My Mom showed me how to make these ornaments last year, and the glitter is all inside. That means that it won’t fall off, can’t be rubbed off, and that you can apply vinyl or other decorative accents to the outside of the ornament.

These ornaments couldn’t be simpler to make – you will need plain glass bauble ornaments, superfine glitter, and adhesive. Polyurethane is not an acceptable adhesive – the glitter will slough off and just look funny. Lightly thinned white glue, Mop and Glo, or Ceramacoat Interior Gloss Varnish all work fine. My Mom had a glue specifically made for this – I couldn’t find it at my craft store. Some people also use ink refills – I would not use the pricey ink when my glitter is already colored, so I haven’t tried that one myself.

To begin with, pop the tops off of your ornaments, and figure out where you will be setting them to dry. I used the carton that they came in. Choose your glitter, and adhesive. Almost any fine glitter will work. The chunky gold glitter in this photo did not work well – I included it so you can see the difference in the size of the glitter.

Pour about a tablespoon of adhesive into the ornament. Carefully spin the ornament around slowly so that the interior is evenly coated in adhesive. If you shake the ornament, lots of little bubbles will form and look funny in the finished product.

Turn the ornament upside down over the bottle (or an empty cup) to drain. I had two bottles of adhesive, so I worked on the next ornament while the first one drained. The Mop and Glo is thin, so it will drain fairly quickly. The thicker varnish may take 3-5 minutes for the excess to drain.

Grab a paper towel or rag, and wipe the excess adhesive out of the ornament stem before you turn it right side up. (Most of the ornament stems will have a small lip that prevents all of the excess from draining.)

Grab your glitter, and pour about a tablespoon into the ornament. I didn’t use a funnel, since the small bottle poured easily, and I didn’t want my glitter colors mixing. You can carefully twirl the ornament, or just stick your thumb over the hole and shake it up. I tried it both ways, and there is no noticeable difference in coverage.

If you didn’t have enough glitter in it to coat the entire inside, add some more and shake it up again. If you had too much, pour the excess back out and into your glitter container. Or, pour it out onto a piece of paper and fold to pour the glitter back into your glitter vial.

Set the ornament aside to dry for at least 2 hours before you stick the top back on. The wire that clips the top on may scratch some of the glitter off, so consider how you would like the hook to be positioned before you put it back on. If you spin it around you may end up removing a little glitter in the stem where it is visible.

Adorn your ornament – I used my cricut to cut out vinyl lettering. I also added some little bits of ribbon – a bow just didn’t look right. If you love how these look, but don’t have the time (or inclination) to make them yourself, I have some for sale in my etsy shop.

10 Comments »
RSS feed for comments on this post. TrackBack URI
Leave a comment
Cooking Games
For cooking games my yuku and food username is Random Rachel. Please leave a comment as a review for recipes you have tried. Even if you aren't playing cooking games, comments are a great way to review a recipe or project you have tried :)
Thanks for visiting!

Follow on Facebook

Popular Tutorials:


Create a free website or blog at WordPress.com.
Entries and comments feeds.

These are so cute!!! I love how you did the different colors. You are very creative, indeed 🙂
Comment by mommashelby— November 30, 2010 #
Thanks Mrs. Amy 🙂
Comment by Random Creativity— November 30, 2010 #
[…] tape keeps your design perfectly lined up, and allows you to see exactly where it will be placed. Personalized Christmas ornaments look so much nicer with the letters lined up neatly. And transfer tape is relatively inexpensive […]
Pingback by Using transfer tape with vinyl decals « Random Creativity— March 19, 2011 #
[…] saw this post a couple years ago called homemade glitter ornaments and always wanted to try it. They are very simple and easy to […]
Pingback by Christmas Ornaments « My Blog— August 29, 2011 #
[…] source […]
Pingback by Thanksgiving Scrooge |— November 8, 2011 #
[…] Glitter Ornaments […]
Pingback by Crafts for Littles 15 « Kate1975's Blog— November 25, 2011 #
[…] Glitter Bauble Ornaments – 15 […]
Pingback by Handmade Christmas Gifts « Random Creativity— December 6, 2011 #
[…] 8. https://randomcreativity.wordpress.com/2010/11/29/glittered-christmas-bauble-ornament-tutorial/ […]
Pingback by CREATE…some XMAS EYE CANDY « ACT. REACT. or just THINK about it!— December 9, 2011 #
I think they are very elegant. pinterest will keep me very usy this year in preparing ornaments & gifts. Your beautiful ornament is very motivating to get started. thank you for sharing.
Comment by Deborah Mohler— January 10, 2013 #
that was a great idea that your mum had i did it and i worked out like yours did
Comment by bianca— December 20, 2015 #